


Now that you know what Git is and how GitHub fits into the picture, you’re ready to learn the basic workflow of Git.
In this tutorial, you will learn the absolute basics of what to do to track your personal projects using Git and GitHub. There is so much that can be said about why and how and what each part means. It’s far too much to cover in one beginner tutorial, so if there’s a section you don’t understand and really want to know more about, the best option is to Google it. Googling is a skill (yes, really) and you will need to use it day-in, day-out if you work as a developer. Do not be afraid to use it!
For now, though, I want you to try to read through the entire post before you start looking into details: sometimes, it’s best to get an overview first, because diving too deeply too soon can be a recipe for confusion and frustration.
We will break this post down into three sections: getting started with Git, hooking a project up to GitHub, and then daily Git/GitHub workflow.
1. How do I start tracking my project on Git?
Here is a basic overview of how we work on personal projects using Git. We are going to assume that you already have Git installed on your computer and are in the Terminal. Review some basic terminal/command line prompts here and here if you feel a bit rusty.
We create a local project folder on our computer and enter it
$mkdir ProjectFolder
$cd ProjectFolder
We initialise/start Git tracking on that folder
$git initWe create our README.md file with some filler text
$echo My New Project > README.mdWe add our folder contents to the staging area, telling Git these are the files for which we want to track changes
$git add .We commit our files to Git, along with a message in present tense explaining the change
$git commit -m "Add README.md"
Item 4 needs a bit of explanation: in Git, before we ‘save changes’, we add files to the ‘staging area’ using $git add filename.txt. This is in case we have specific files we have changed, but don’t want to save. In the above case (and in most cases), we won’t need to be so specific, and so we can simply add all files in our current directory. If you’re going to Google anything today, Google ‘Git Staging Area’!
Item 5 is where we essentially hit ‘Save As’ on the project. We tell Git to keep a copy of the project exactly as it is right now. In this way, if in future we stuff something up, we can always go back and see previous versions of each and every file in our directory.
We can also combine steps 4 and 5, by staging and committing all files at once using the -am flag, for example:
$git commit -am "Add README.md"
2. How do I connect Git and GitHub?
We now have a working directory for our project, and Git is tracking any and all changes we make, but we don’t yet have a remote (online) repository where we can keep everything. GitHub is the leading platform for storing and accessing projects tracked using Git, so you will need to go there and create an account before we continue.
Now that we have a GitHub account, we’re ready to create a new repository and link it up to our local folder:
Connecting an existing repository from your computer to GitHub
We currently have a local repository and we want to add it to an empty GitHub repository. The direction of the connection is from local to remote. We will therefore use $git remote add as our method of connecting them.
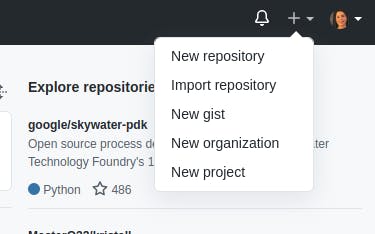
Create a new repository on GitHub: click on the green button in the left-most menu, or click the plus in the top right and then ‘New Repository’
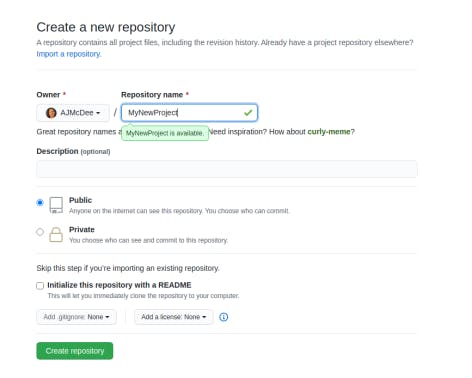
Enter our new repository name, ideally similar or identical to our local repository name or as similar as possible so we don’t get them mixed up in future. Keep it public and click the green ‘Create Repository’ button
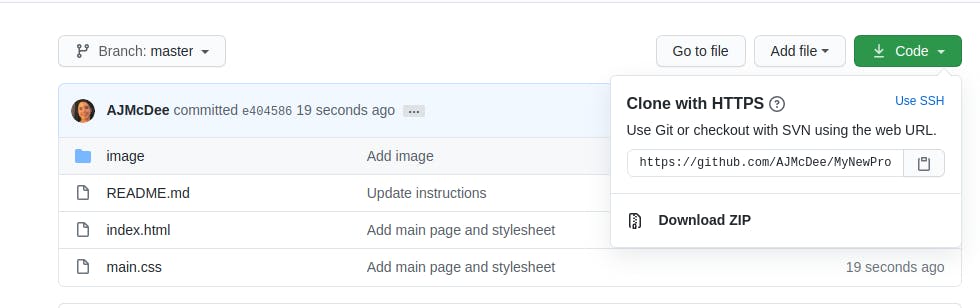
We now have a remote repository (huzzah!) but there’s still nothing in it, and no link is established. After creating our GitHub repository, we’re taken to a page with the link which we need for Git. Take the HTTP link, copy it, and then paste it into the Terminal as per the example below. Make sure that you have used
$cdto get into the correct project folder first, or else you’re gonna have a bad time: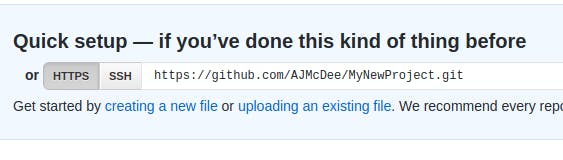
$git remote add https://github.com/AJMcDee/MyNewProject.gitOur local Git repository is now linked to our empty remote (online) GitHub repository, but we still need to ‘push’ (the fancy term for upload) our files/changes/history up onto GitHub. To do so, we type:
$git push -u remote originIf we refresh our repository page on GitHub, we should now see our README.md along with the dummy text we put into it early on.
Connecting a GitHub repository to a local folder
Let’s say you’ve done the above on your home PC, but it’s a gorgeous day so you want to head out to a cafe and work on your laptop instead. On your laptop, you don’t have any of the files from your repository, but you do have access to wifi (whew!).
To copy your remote (GitHub) repository to your computer, we’re going to use the $git clone command, supplying us with an exact copy (clone!) of all your files and your Git commit history.
Go to your GitHub profile and click on the repository you want to clone.
In the top right, you will see a green button. Clicking on that will bring up a URL for you to copy.
In the Terminal, navigate to the directory where you want to store the project (note that clone will create a new folder for you with the GitHub repository name, so you don’t need to create a dedicated folder yourself!). Let’s say we want to store it in our Home Directory
$cdNow we will use the URL we copied to clone the repository, for example:
$git clone https://github.com/AJMcDee/MyNewProject.git
Congratulations! You now have a connection between Git and GitHub, and all your files are up to date in both locations. Now you want to start building your project and tracking changes…
3. Daily workflow: Pull, branch, change, commit, merge, push
The above headline is the basic workflow you will need day-in, day-out when working between Git and GitHub.
Since this post is only aimed at personal projects and not collaborative ones, there is an argument for ignoring the ‘pull’ (fancy Git term for download) side of this relationship, but it is a good habit to get into so I’m including it. The same applies to branches: assuming only one person is working on our project, we might as well always work in the master branch, but since we want to form good long-term habits, let’s branch starting today.
Before you follow any of the below steps, make sure you have navigated to your project folder .
Pull (i.e. download) any changes which may have occurred to the remote (GitHub) repository. This way, if anyone else has worked on the project (or if we have updated it from another computer) we receive all the changes and stay up to date.
$git pullCreate a new branch: think of this as a separate working space where you can test and tinker without ‘ruining’ the main files. In a professional space, branching would be used so that different team members can work on different problems at the same time. That doesn’t apply to us, but we’re going to build those habits up now to save ourselves some pain later. So let’s start working in a new branch called ‘MyChanges’:
$git checkout -b MyChangesAdd, remove, or edit files and directories as you please. This is where most of the coding for our project actually happens!
Once we’ve made some changes and want to save them more permanently, we will now add and commit them together in Git, with a message covering what we changed.
$git commit -am "Add index.html and style.css"We can (and should) repeat Steps 3 and 4 multiple times as we make more and more changes. The more we commit, the more options we have for rolling back any changes later on. However, you usually don’t want to save every tiny change you make (though there are programmers who do!). Personally, I like this answer!
Whew! We’ve spent the whole day coding in our MyChanges branch and our files are looking great! Before we go to our yoga class, though, we need to make sure that our main branch is updated with our work from the day. Let’s hop over to the master branch, merge it all in, and then delete the now-redundant branch:
$git checkout master
$git merge MyChanges
$git branch -d MyChanges
Our final step is to ensure that all the changes are also added to GitHub, just in case we need to access it elsewhere, have someone else look at our code, or our main computer dies. So now we push (upload!) everything to our remote (GitHub) repository:
$git push
Voila! The day is over! All our changes are updated and saved to the cloud, along with every version of the project we’ve ever had. We can access it from anywhere, our friends can access it from anywhere, and if we want to we can let others work on it with us.
That was a lot of information! Can I see it all in one place just with the commands?
Sure! Here you go:
((Create local project folder))

$ mkdir ProjectFolder
$ cd ProjectFolder
$ git init
$ echo My New Project > README.md
$ git add .
$ git commit -m "First commit with README.md"

((Connect local to an empty GitHub repository))

$ git remote add https://github.com/AJMcDee/MyNewProject.git
$ git push -u remote origin

((Bring your GitHub repository onto a different computer, for example))

$ git clone https://github.com/AJMcDee/MyNewProject.git

((Daily workflow))

$ cd ProjectFolderName
$ git pull
$ git checkout -b MyChanges
<<Work on your code here>>
$ git commit -am "Describe changes here"
$ git checkout master
$ git merge MyChanges
$ git branch -d MyChanges
$ git push
Conclusion
I know that was a lot of information, but those are the basic commands you need. Remember that the first and second sections are purely about project setup: day-to-day, all you’ll need are those commands in the daily workflow section.
As said, you could deep dive on topics related to any part of this post, but if you’re new to Git and GitHub, these are the steps you can take to start tracking a new project TODAY. I hope you enjoy exploring the amazing world of open-source code and I will try to bring you more informative tutorials and discussions in the near future.